Introduction
You’ve got your premium cannabis seeds ready to go, and you’re excited to start your grow—but first, you need to germinate them. Germination is the critical first step that determines whether your seeds will successfully sprout and grow into healthy plants.
The good news? Germinating cannabis seeds is simple when you know what you’re doing. The even better news? We’re about to show you three proven methods that work every single time, plus troubleshooting tips to ensure success even if things don’t go perfectly.
Whether you’re a first-time grower or experienced cultivator looking to improve your germination success rate, this comprehensive guide will teach you everything you need to know about sprouting cannabis seeds.
Let’s turn those seeds into thriving seedlings!
Understanding Cannabis Seed Germination
What Is Germination?
Germination is the process where a dormant seed awakens and begins growing into a plant. Inside every cannabis seed is a tiny embryonic plant with a root, stem, and first leaves, plus stored nutrients to fuel initial growth.
When exposed to the right conditions (moisture, warmth, and darkness), the seed absorbs water, swells, and cracks open. A small white taproot emerges, followed by the stem and first leaves (cotyledons).
How Long Does Germination Take?
Typical timeline: 24-72 hours for the taproot to appear, though some seeds may take up to 7 days.
Factors affecting speed:
- Seed freshness (fresher seeds germinate faster)
- Seed genetics (some strains sprout quicker than others)
- Temperature (warmer temps speed germination)
- Moisture levels (proper hydration is critical)
- Seed storage conditions (poorly stored seeds take longer)
What Cannabis Seeds Need to Germinate
Your seeds need three essential conditions to sprout:
1. Moisture: Seeds must absorb water to activate the growth process. However, too much water can drown seeds or cause rot.
2. Warmth: Ideal temperature is 70-77°F (21-25°C). Below 65°F, germination slows dramatically. Above 80°F risks cooking your seeds.
3. Darkness: Seeds germinate best in darkness. Once sprouted, seedlings need light immediately.
Pro Tip: Think of germination like making the perfect cup of coffee—you need the right balance of ingredients and conditions. Too much or too little of anything, and the results suffer.
Before You Start: Quality Seeds = Better Results
Not all seeds are created equal. Germination success starts with high-quality genetics.
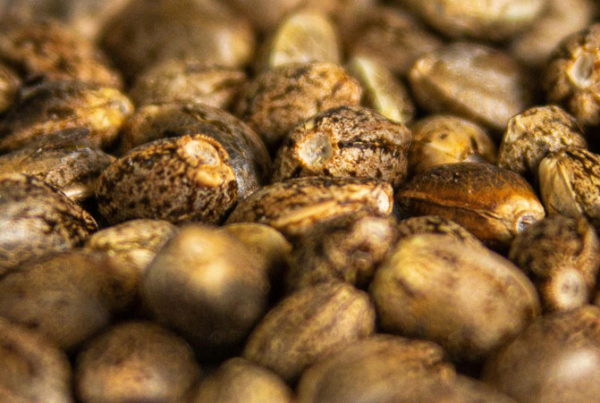
Signs of Healthy Cannabis Seeds
Visual inspection:
- Dark brown color with tiger stripes or mottled patterns
- Hard, waxy coating when touched
- Intact and plump (not flat or shriveled)
- No cracks, holes, or damage
Bad seeds to avoid:
- Pale green or white coloring
- Soft, squishy texture
- Cracked or damaged outer shell
- Extremely small or misshapen
Testing seed viability: Place seeds in a glass of water. Viable seeds sink within 1-2 hours. Seeds that float after 2 hours may be duds (though not always—give them a chance if from a trusted source).
Proper Seed Storage
If you’re not germinating immediately:
- Store in a cool, dark place (refrigerator door is ideal)
- Keep in an airtight container with silica gel packets
- Maintain temperature of 41-46°F (5-8°C)
- Avoid temperature fluctuations and direct light
Properly stored seeds remain viable for 2-5 years or longer!
Method 1: The Paper Towel Method (Most Popular)
This is the most widely used germination method among cannabis growers—and for good reason. It’s simple, reliable, and lets you monitor progress easily.
What You Need
- High-quality cannabis seeds
- Two clean plates (paper or ceramic)
- Two paper towels (unbleached, chemical-free preferred)
- Distilled or filtered water (not tap water)
- Spray bottle (optional but helpful)
- Warm, dark location
Step-by-Step Instructions
Step 1: Prepare Your Paper Towels Dampen both paper towels with distilled water. They should be moist but not dripping wet—think of a wrung-out sponge. Excess water can drown seeds.
Step 2: Set Up Your Germination Station Place one damp paper towel on a plate, smoothing out any wrinkles or folds.
Step 3: Position Your Seeds Place cannabis seeds on the paper towel with about 1 inch of space between each seed. Don’t overcrowd—they need room to sprout.
Step 4: Cover the Seeds Gently place the second damp paper towel over the seeds. Press lightly to ensure good contact.
Step 5: Create a Dark Environment Cover with the second plate, creating a dark, humid dome. Some growers place the setup inside a closed cupboard for extra darkness.
Step 6: Maintain Ideal Conditions
- Keep in a warm location: 70-77°F (21-25°C)
- Check daily and mist with water if paper towels start drying out
- Never let paper towels dry completely
- Don’t oversaturate—seeds need oxygen too
Step 7: Watch for Taproots Within 24-72 hours, you’ll see white taproots emerging from cracked seeds. Wait until taproots are 0.5-1 inch long before transplanting.
Step 8: Transplant Carefully Once taproots reach proper length:
- Prepare small pots with pre-moistened growing medium
- Make a hole 0.5-1 inch deep
- Gently pick up seed using tweezers or clean fingers
- Place seed taproot-down in hole
- Lightly cover with growing medium
- Don’t pack soil tightly
- Keep moist but not waterlogged
Paper Towel Method: Pros and Cons
Pros:
- Easy to monitor progress
- High success rate
- Minimal equipment needed
- Works with any strain
- You can see exactly when seeds sprout
Cons:
- Requires careful handling of delicate taproots
- Must check moisture levels daily
- Risk of taproot damage during transplant
- Extra step compared to direct methods
Common Mistakes with Paper Towel Method
❌ Using tap water: Chlorine and minerals can inhibit germination. Always use distilled or filtered water.
❌ Too much water: Drowning is real. Paper towels should be damp, not soaking wet.
❌ Letting paper towels dry out: Check daily and mist as needed.
❌ Wrong temperature: Too cold slows germination; too hot kills seeds.
❌ Opening plates constantly: While checking is important, excessive disturbance can stress seeds.
❌ Transplanting too early: Wait for taproot to be 0.5-1 inch long for best results.
❌ Rough handling: Taproots are extremely fragile. Handle with utmost care.
Method 2: Direct Soil Germination (Easiest & Most Natural)
This method mimics nature—plant the seed directly in soil and let it do its thing. It’s the least stressful method for seeds since there’s no transplanting required.
What You Need
- Cannabis seeds
- Small pots (4-inch diameter ideal)
- Quality seedling/starter soil or potting mix
- Spray bottle or gentle watering can
- Humidity dome or plastic wrap (optional)
- Warm growing environment
Step-by-Step Instructions
Step 1: Prepare Your Pots Fill small pots with pre-moistened seedling soil. Leave about 0.5 inches from the top. Gently pat down but don’t compact.
Step 2: Pre-Moisten the Soil Water soil lightly before planting. It should be damp throughout but not muddy or waterlogged.
Step 3: Create Planting Holes Using your finger or a pencil, make holes 0.5-1 inch deep in the center of each pot.
Step 4: Plant Your Seeds Place one seed in each hole. It doesn’t matter which way is “up”—the taproot will naturally grow down and the stem will grow up.
Step 5: Cover Gently Lightly cover seeds with soil. Don’t pack it down—sprouts need to push through easily.
Step 6: Keep Moist and Warm
- Mist soil surface with spray bottle to keep moist
- Place in warm location (70-75°F / 21-24°C)
- Optional: Cover with humidity dome or clear plastic wrap to retain moisture
- If using cover, remove once sprouts appear
Step 7: Wait and Watch Seeds typically emerge from soil within 3-7 days. Some may take up to 10 days—be patient!
Step 8: Remove Covers Once sprouts break the surface, immediately provide light and remove any humidity domes.
Direct Soil Method: Pros and Cons
Pros:
- Most natural method
- No transplant shock
- Less handling = less risk of damage
- Simpler process with fewer steps
- Works great outdoors
Cons:
- Can’t monitor germination progress
- Slightly lower visibility of success/failure
- Takes longer to see results
- Harder to troubleshoot if seeds don’t sprout
Tips for Success with Direct Soil Method
Choose the right soil: Use light, airy seedling mix—not heavy garden soil. Heavy soil makes it hard for sprouts to break through.
Don’t plant too deep: 0.5-1 inch is ideal. Deeper planting means more work for the tiny sprout.
Maintain consistent moisture: Check daily and mist if surface dries out. Inconsistent moisture is the #1 reason for germination failure with this method.
Provide light immediately: Once sprouts appear, they need light within hours to prevent stretching.
Be patient: Some seeds are slow starters. Don’t give up until at least 10 days have passed.
Method 3: Water Glass/Cup Method (Fastest for Stubborn Seeds)
This method involves soaking seeds in water to rapidly hydrate them. It’s particularly effective for older seeds or those with harder shells.
What You Need
- Cannabis seeds
- Clean glass or cup
- Distilled or filtered water (room temperature)
- Warm, dark location
- Paper towels or pots for transplanting
Step-by-Step Instructions
Step 1: Fill Your Glass Fill a clean glass with room temperature distilled water (70-75°F / 21-24°C). Don’t use hot or cold water.
Step 2: Add Your Seeds Drop cannabis seeds into the water. They’ll likely float at first—this is normal.
Step 3: Wait and Monitor
- Leave in a dark, warm place
- Check every 12 hours
- Seeds should sink within 1-2 hours (though some float longer)
- Taproots typically emerge within 24-48 hours
Step 4: Don’t Oversoak Critical: Don’t leave seeds in water longer than 24-32 hours maximum! Oversaturating seeds can drown them or cause rot.
Step 5: Transfer to Growing Medium Once taproots appear (even tiny ones), immediately transfer to:
- Paper towels for further development (Method 1), OR
- Directly into soil or other growing medium (Method 2)
Water Glass Method: Pros and Cons
Pros:
- Very fast—often shows results within 24 hours
- Great for older or stubborn seeds
- Helps soften hard seed shells
- Easy to see when germination begins
Cons:
- Risk of drowning if left too long
- Requires close monitoring
- Still needs transfer to another medium
- Not ideal for beginners due to timing sensitivity
When to Use Water Glass Method
This method is best for:
- Older seeds that need extra help
- Seeds with very hard outer shells
- When you need to pre-soak before using another method
- Experienced growers comfortable with precise timing
Pro Tip: Many experienced growers combine methods—starting with 12-24 hours in water, then transferring to paper towels or soil for final sprouting.
Advanced Technique: The Rockwool Cube Method
Popular with hydroponic growers, this method uses rockwool cubes—a sterile, pH-neutral growing medium.
Quick Overview
What You Need: Rockwool starter cubes, pH-adjusted water (5.5-6.0), cannabis seeds
Process:
- Soak rockwool cubes in pH-adjusted water for 30 minutes
- Squeeze out excess water gently
- Place seed in pre-made hole (0.5 inches deep)
- Cover loosely with rockwool
- Keep warm and moist
- Sprouts emerge in 3-7 days
Advantages: Perfect for hydroponics, no transplant shock, sterile environment
Disadvantages: Requires pH adjustment, more expensive, learning curve for beginners
Germination Troubleshooting Guide
Seed Isn’t Sprouting After 7+ Days
Possible causes:
- Seed is too old or improperly stored
- Temperature too cold
- Not enough moisture
- Too much moisture (drowning)
- Seed wasn’t viable to begin with
Solutions:
- Verify temperature is 70-77°F
- Check moisture levels (not too wet or dry)
- Give it a few more days—some seeds are slow starters
- If using paper towel method, carefully check if taproot has started but gotten stuck
Taproot Appears But Stops Growing
Possible causes:
- Taproot dried out
- Temperature stress
- Handled too roughly during transplant
Solutions:
- Keep moisture consistent
- Check temperature
- If transplanted, ensure growing medium is properly moist
- Give it 24-48 hours—sometimes they’re just slow
Seed Shell Stuck on Cotyledons (Helmet Head)
When sprouts emerge from soil, sometimes the seed shell stays attached to the first leaves.
Solution:
- Mist the shell with water several times to soften it
- Wait 24 hours and mist again if needed
- Gently assist removal with tweezers if necessary (be very gentle!)
- Don’t force it—you can damage the plant
Sprout Is Stretching (Getting Tall and Thin)
Cause: Not enough light immediately after emergence
Solution:
- Move light source much closer
- Increase light intensity
- Support stem with toothpick if necessary
Seed Germinated But Taproot Is Growing Upward
Don’t worry! Taproots are geotropic—they naturally sense gravity and will curve downward. Just ensure adequate moisture and wait.
Mold or Fungus on Seeds or Paper Towels
Cause: Too much moisture and/or poor air circulation
Solution:
- Remove affected seeds immediately
- Start fresh with new seeds and materials
- Use less water this time
- Ensure some air circulation
- Consider using hydrogen peroxide solution (1 part 3% H2O2 to 9 parts water) to prevent fungus
Germination Success Rates: What to Expect
Fresh, high-quality seeds from reputable sources:
- Paper towel method: 90-95% success rate
- Direct soil method: 85-90% success rate
- Water glass method: 85-95% success rate
Older seeds (2-5 years with proper storage):
- 60-80% success rate
Old or improperly stored seeds:
- 30-60% success rate (or lower)
Key takeaway: Starting with premium, fresh seeds from trusted sources (like JG Seeds!) dramatically improves your germination success rate.
After Germination: Caring for Seedlings
Once your seeds have sprouted, they enter the seedling stage. Here’s what they need:
Light
Seedlings need 18-24 hours of light per day. Place lights 2-4 inches above seedlings (for fluorescent or LED). Move closer if seedlings stretch.
Water
Water very lightly with a spray bottle. Seedlings have tiny root systems and can easily be overwatered. The growing medium should be moist but not soggy.
Temperature and Humidity
- Temperature: 68-77°F (20-25°C)
- Humidity: 60-70%
Nutrients
Don’t feed for the first 1-2 weeks! Seedlings use stored nutrients from the seed initially. Wait until 2-3 sets of true leaves appear before introducing diluted nutrients.
Air Circulation
Gentle airflow strengthens stems. Use a small fan on low setting, not blowing directly on seedlings.
Pro Tips for Maximum Germination Success
1. Always use distilled or filtered water. Tap water contains chlorine, chloramine, and minerals that can inhibit germination.
2. Pre-soak older seeds. For seeds more than a year old, consider a 12-24 hour water glass pre-soak to improve success rates.
3. Scuff hard-shelled seeds. Gently rub very hard seeds with fine sandpaper to thin the shell slightly. Do this very carefully!
4. Use a heat mat. Seedling heat mats maintain perfect temperature and can increase germination speed by 24-48 hours.
5. Don’t rush. Some seeds germinate in 24 hours; others take a week. Patience is critical.
6. Germinate more than you need. If you want 3 plants, germinate 4-5 seeds to account for any that don’t make it.
7. Handle with extreme care. Taproots are incredibly delicate. Even gentle touching can damage them.
8. Keep everything clean. Use clean hands, clean materials, and clean water to prevent contamination.
9. Document everything. Track which seeds germinated, how long it took, and which method you used. This data helps future grows.
10. Buy quality genetics. The single biggest factor in germination success is seed quality. Don’t compromise here.
Frequently Asked Questions
Q: Should I germinate seeds in the dark or light? A: Germinate in darkness. Once taproots appear and you plant them, provide light immediately when they break the soil surface.
Q: Can I use tap water for germination? A: It’s not recommended. Tap water contains chlorine and other chemicals that can inhibit germination. Use distilled or filtered water for best results.
Q: How deep should I plant germinated seeds? A: 0.5-1 inch deep maximum. Taproot should point downward if visible, but if you can’t tell which end is which, don’t worry—the plant will figure it out!
Q: What if my taproot is really long before I plant it? A: Long taproots (2+ inches) are more fragile and harder to plant without damage. Ideally, plant when taproots are 0.5-1 inch long.
Q: Can I germinate seeds in a windowsill? A: For initial germination (before they sprout), yes—as long as temperature is appropriate. Once sprouted, seedlings need much stronger light than a window provides.
Q: Do I need to pH adjust water for germination? A: Not critical for germination itself, but once planted, cannabis prefers pH 6.0-7.0 in soil or 5.5-6.5 in hydroponics.
Q: My seed popped but won’t grow. What happened? A: Could be drowning, temperature stress, or the seed simply wasn’t viable. Ensure proper moisture and temperature. Sometimes seeds just fail—it happens even with quality genetics.
Q: Can I reuse paper towels between seeds? A: No! Always use fresh, clean materials for each germination session to prevent contamination and disease.
Q: Should I use a humidity dome? A: Optional for paper towel method (plates serve the same purpose). Helpful for direct soil method to maintain moisture, but remove immediately once sprouts appear.
Q: Will cold stratification help cannabis seeds? A: No. Unlike many plant seeds, cannabis seeds don’t require cold stratification. They want consistent warmth.
Germination Checklist
Use this quick checklist to ensure success:
Before Starting:
- Quality seeds from reputable source
- Distilled or filtered water prepared
- Clean materials and workspace
- Warm location identified (70-77°F)
- Growing medium prepared (if using)
During Germination:
- Seeds staying moist (not drowning)
- Temperature maintained at 70-77°F
- Seeds kept in darkness
- Checking progress daily
- No mold or contamination
After Taproot Appears:
- Taproot is 0.5-1 inch long
- Planting holes prepared
- Handled gently during transfer
- Planted at correct depth
- Light source ready
- Growing medium moist but not waterlogged
Conclusion: You’re Ready to Germinate!
Germinating cannabis seeds doesn’t have to be complicated or stressful. Whether you choose the paper towel method, direct soil germination, or the water glass technique, following these proven methods will give you the best possible success rate.
Remember these key principles:
- Start with quality seeds
- Maintain proper moisture (not too wet, not too dry)
- Keep temperature at 70-77°F
- Provide darkness during germination
- Be patient and gentle
- Handle taproots with extreme care
Every successful cannabis grow begins with successful germination. By following the techniques in this guide, you’re setting yourself up for a healthy, productive grow from day one.
Ready to start germinating? All JG Seeds cannabis seeds come with a germination guarantee—we’re confident in our genetics and want you to succeed. If you follow proper germination techniques and your seeds don’t sprout, we’ll replace them.
Happy germinating! 🌱
Get Started with Premium Cannabis Seeds
Shop our collection of high-quality, guaranteed-to-germinate cannabis seeds:
- ✅ Fresh, hand-selected genetics
- ✅ Germination guarantee
- ✅ Discreet, fast shipping
- ✅ Growing support included
- ✅ Farm Bill compliant
[Shop All Cannabis Seeds] | [Beginner Seed Collection] | [Download Free Germination Guide PDF]
Need help with germination? Our growing experts are here to assist! Contact us with questions or join our community forum for personalized advice. We want every seed to succeed!
Disclaimer: This guide is for educational purposes in jurisdictions where cannabis cultivation is legal. JG Seeds promotes responsible, legal cannabis cultivation. All products contain less than 0.3% THC and comply with federal law. Check your local laws before growing cannabis. We accept no liability regarding cultivation laws in specific jurisdictions.